Monday, November 24, 2008

I think I was thinking of Dita...........


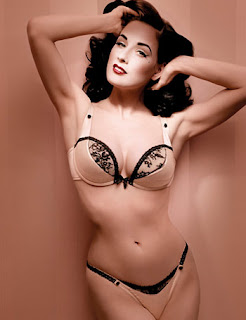
I'm pretty sure that I had Dita Von Teese in mind when I made this clip for the new collection 'Folly by Julie Fleming' made from Diamantes with hair clip on the back - would look great on a 1950's updo or victory roll style hairdo - found this simple instruction video for the perfect quick up do at Super Kawaii Mama try 'Easy Peasy Vintage Hair'
Diamante Hair clip will be available Feb 2009.

Friday, November 21, 2008

Gardenia's for the hair


I thought Nicole Kidman looked beautiful in her hair flowers and have just added my version to our store Julie Fleming for the diva's out there. These are classic and very lifelike gardenia's.

Thursday, November 20, 2008

Sun Hats for the shop Ivory Sisal


This is the latest Ivory Sun Hat I have made for the shop and how lucky was I - just had enough of this lovely vintage straw trim to put around the crown - with one bobble left over !


This type of trim was always made by hand and is just small strip straw rolled on it's edge and stitched into place, this type of straw is pretty hard to find these days and I have had this piece of trim for I don't know how long I came across it at the bottom of a box while looking for trims for a couple of child's hats I made for the final day at the racing - two matching little sisters - they had adorable matching white lace Collette Dinnigan dresses.

How to Sew Bow detail on Sunhat


8) The finished item ! (hopefully looking very 'southern belle' rather than KFC 'Dickie bow')

7) Add elastic so the creation won't blow away !


6) Tie tack the two tops (loops) of the bow into place and the two ties using cream for the brim (no ugly black cotton on the underside of the brim).

5) Position onto the hat hold in place with some pins, sew from behind and under the head fitting of the hat...tricky but easy if you know how. No need to overdue this bit as just a couple of stitches either side of the center is all you need. One of the old ladies I used to work with in London said that you needed 'fairy fingers' to do some parts of millinery and I have yet to find a better description.

4) The finished bow.

3) Next add the center of the bow stitch in place at back.

2) Workout the position to make sure that the join of the band underneath is hidden under the middle of the bow.

1) Start with the two loops for the top and then add the ties, hand sew all into place.


Just a quick little instruction to putting a snappy little bow on a straw hat these little bows have been inspired by the hat Nicole Kidman is wearing in the movie 'Australia'. A favourite of mine for a long time this style of bow really adds the finishing touch to a beautiful sunhat and seeing Nicole wearing this hat reminded me of this type of bow. I think I must have made so many of them over the years and have added some photo's so you can see how to construct and sew a bow like this onto a hat successfully (!) I made mine on this occasion out of four separate pieces of ribbon but I do make them on occasions just by tying the bow from one piece of ribbon but that really does take a lot of skill and hard to photograph one handed. Just in case you are wondering yes I left the little stalks on the black straw rather than trim them off as I think they add some graphic interest. More variations on the big sun hat to follow.

Bow mad at the moment


Some bows for inspiration - love the petersham bow that I just made for a hat for the shop and thought I would show you some of the latest that I have made and some interesting others I have seen. I love my bows in the ice blue vintage velvet - found a whole roll !

Look at this beauty...


Just added a comb to this lovely Butler and Wilson brooch for a bride to wear in her hair and thought I would share it with you. Now that's what I call costume jewellery, it's kind of blasphemy adding a plastic comb but I have made it so it is easily removed after the event.

Wednesday, November 19, 2008

Cherries anyone?


The most lushest cherry's have just arrived these are for our store julie fleming. I used these on a fabulous little hat for Alannah Hill this year and thought that they are so nice I would get some more and sell them to other mad milliners and crafts people out there as these were really hard to find. They are so lifelike I have had people try and eat them - they also come in this cute little plastic 'punnet'.

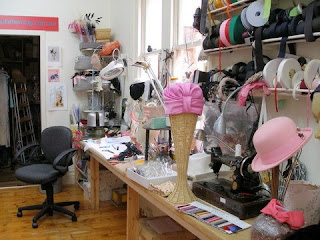
My Studio


My mess of a studio still waiting for the clean up fairy to come along ! Although usually on a Friday night I often have a big clean up so I give myself a big surprise on Tuesday morning because by then I have managed to forget I have had a clean up............strange but true.
I love the size I must admit although the bigger the studio the larger the potential to get into a serious mess. I have had this studio for six years and all my previous studios have been really small, so here I have room to spread out and to create and this studio has the most wonderful natural light. The view outside is of blond brick wall but I can see some blue sky if I take the time to look up through the buildings. My shop and studio, (you can see into the shop and from the shop into the studio) is in a Victorian house and the shop is in the front two rooms and hallway and my large studio is I guess in what was once two bedrooms at the back (as the walls have been removed it's a bit hard to imagine).
You can see my old sewing machine, straight sewer only - no ziz zag or reverse but will sew through your finger if you let it ! which is the only one I use as most of my millinery work is hand sewn so I only use a machine on the easily accessible parts of a hat and I also make things like the navy scarf/headband there on the mannequin (this is the one I handmade for a customer during Spring Racing Carnival - I was making her one in black silk but only discovered that is was not black but French navy at the last minute !!!) I was literally putting in the last stitch and the long tail of the scarf fell on my jumper - which was black - and this is when I discovered that they had sold me the wrong colour at the fabric store and I had in fact made a dark navy one!! So nothing else to do but head back to the fabric store for the correct colour - I should rely more on my instincts as I noted when I spread the fabric out on the cutting table to cut it, it did look like charcoal and not black and I thought to myself 'oh, that's a nice charcoal black...'...well, will double check next time but not the sort of thing you want to have happen when you are so flat out busy. I have a huge set of steel frame shelves (they cost a small fortune to have put in place and are they ugly!) this is where all the feathers , straws, felts and silk flowers are all kept in their separate colours.
This building is set between two big buildings and this little house looks a bit squashed in but I am so glad it is still here as I would hate to be in a modern concrete building (box). I also have a storage room and big kitchen and off street parking - perfect...all that's left is for me to get creating. That is my abandoned chair there as I have run off to the computer again !
Friday, November 7, 2008

Spring Racing is over and now on to Summer !


Welcome to my blog this is where I will showcase the many and varied 'things' I make....see you soon. Here are the latest summer hats made from pari sisal straw with natural stitched straw detail, these hats are to order and a very fine addition to your summer wardrobe. The pari sisal is a very light weight and soft straw which lends itself expertly to 'summer'.


Related Posts with Thumbnails